
Feminine hygiene products. What a fun topic! Personally, I’m a cup user. Someday, I’ll probably write about my cup and why I love this option, but today’s not that day. Today, I’m gonna write about mama pads.
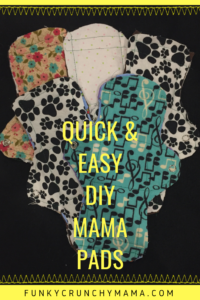
First of all, I say mama pads instead of maxi pads because I made these particularly for post-childbirth needs. Because I wasn’t planning to use them as primary protection when Aunt Flo came to visit, I didn’t bother with a waterproof liner (although you could easily add one). I also call them mama pads because I keep this DIY project super ragged looking. Nothing about childbirth is pretty, so why bother with pretty seams and fancy fabrics? Just keep it cozy.
As an Amazon Associate I earn from qualifying purchases.
My inspiration for making these came a few years ago when I had my IUD removed (TMI? Probably. My apologies.) Long story short, due to a procedure I’d had in the past, removing my IUD turned into something more like minor surgery and I had to use pads for a few days (grumble, grumble).
Due to the hormones in my IUD, I hadn’t had a period in years, so I had no such products at home. I went to the drug store, picked up box of whichever ones seemed suitable, and put one on. The next day, I started to seriously regret not taking more time to research my options at the store. I’d accidentally purchased scented pads and they were horrible! I was so itchy and uncomfortable. It was miserable.
So when I was looking at childbirth recovery, I didn’t want to relive that experience, and decided I would go with cloth. I looked at some cloth options online, but was a little overwhelmed and couldn’t believe how expensive some of them were! I decided to make my own, but frankly, I was too lazy to deal with seam allowances and making these pretty (why do they need to be pretty?), so I just decided to wing it. And ya know what? They turned out great. Without dealing with seam allowances and such, I can easily make a few in an hour or so. They’re also a great way to use up some of my flannel scraps, and they’re soft and cozy and completely unscented and that was all that mattered.
So here’s what you need:
- Flannel (100% cotton)
- I imagine that a quarter yard would make between two and four mama pads, but I recommend using scraps if you have them — or upcycling! You could probably use old t-shirts for filler if this is what you have on hand.
- Sewing machine (although you could probably get away with just a needle and thread, if you’re so inclined)
- Snaps and a snap fastener
I happened to have a hand-me-down snap fastening pliers among the things in my craft drawers, but you can buy these quick kits to add snaps if you don’t want to invest in the pliers. There are more fancy options as well, if (for example), you’re interested in making cloth diaper covers, but I found that these cheap and easy snaps worked just fine.
So here are the steps:
1) Cut out the pattern in a soft flannel (I dig the size on this free downloadable template!). Cut two with wings for each pad and as many of the non-winged ones for filler as desired. (They can just be pad-length rectangles or smaller scraps, if 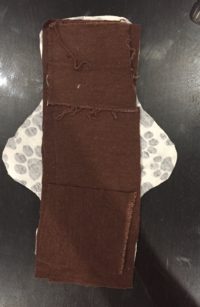 that’s what you have.) I made a variety with between three and six internal layers.
2) Layer, pin, and stitch. Put a winged layer on the top and bottom and stitch around the outside of the non-winged part to make sure all of your layers are together. If you don’t want to deal with stitching curves, straight stitch across the top and bottom a couple of times and then again down each side. Again, it doesn’t matter if it’s pretty. If you find this is too bulky, stitch another row or two closer to the middle to keep your layers drawn close together.
3) Stitch around the wings to keep the fabric from fraying around the snap.
4) Add snaps. Just make sure they’re facing the right way! The lady in the video below does a good demonstration of using the fastener kit.
You’re done! Wash and wear! I just wash mine on hot with towels.
A couple of side notes:
1) The first time I made these, I tried stitching Velcro onto a couple of pads when I ran out of snaps, but the abrasive edges chaffed my thighs and made for a very uncomfortable wearing experience. Don’t make this mistake; stick with the snaps.
2) Not sure what to get a crunchy mama for her baby shower? Try making her a few of these along with a couple of freezer meals and maybe some of these reusable bulk goods bags for pump part storage. She may not know it yet, but they’ll be her favorite gifts.
I hope you enjoy these and don’t forget the template!
— Funky Crunchy Mama

One thought on “Quick & Easy DIY Mama Pads”