


This is one of my favorite baby projects: BOOTIES!
But before I start, I’d like to preface this with: I. Love. Wool. I won’t go too into depth, but a few years ago I took a braided wool rug class at my local history museum and completely fell in love with this medium. My new-found love *may* have sparked a two year second-hand wool shopping binge, which eventually became my inspiration for this project. So perhaps needless to say, I have a nearly endless supply of material for this project.

This post contains affiliate links.
Fortunately for you, all you really need for this project is one soft, old sweater (lambswool, cashmere, or merino are best not to irritate baby’s skin), yarn, a large gauge needle, and Velcro. My guess is that you or someone you know has an old stained, shrunken, completely-out-of-date, or moth-holed sweater that’ll do perfectly for this project. You’ll want to use wool, as this can be felted, preventing fraying. It’s also super warm and has antibacterial and moisture wicking properties, so it’s great for feet.
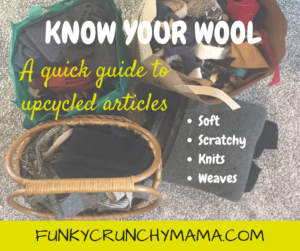
If you’re interested in learning more about the different varieties of wool, please read this post.
Making these booties is fairly simple and you can download the template here!
Step 1: Felting
When you find the perfect woolen item for this project, wash it on warm and dry it on medium. If you’re so inclined (or have another load of towels to wash), do it twice, ensuring that they won’t shrink much (if at all) when washed down the line.
Warning:
 Depending on the sweater, it could shed enough to clog your washer’s draining
sink as well as fill your dryer’s lint trap fairly quickly, so keep an eye on them during the first washing/drying cycle and be sure to empty them when you’re done.
Also, wet wool smells kinda like wet dog, but the stink will go away once it’s dry.
Step 2: Cut out the pattern
Depending on your sweater, you may want to consider pattern direction and/or color alignment before you snip. For example, with this pair, I opted to keep my lines horizontal.

Step 3: Stitch!
I’m kind of a purist with my wool makings, so I usually opt for a wool yarn, like this one by Paton’s. But if you don’t want to invest, whatever you have on hand should do (cotton, acrylic, bamboo). I like to use a pretty blanket stitch for this project. If you’re unsure how to do a blanket stitch, I’ve included a quick how-to video below. I’ve found that the best approach for stitching these booties is to:
1) Start with the inside of the foot (toe piece) and stitch around the toe.
2) Attach and stitch around the heel piece. Do not stretch the wool as you stitch.
3) Connect the toe and heel pieces as you arch over the foot, stitching about halfway. When you connect the two pieces, pinch them together so the edges are together facing outward.
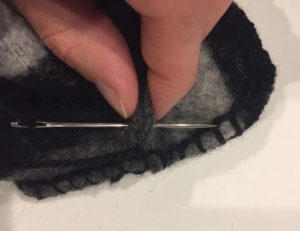
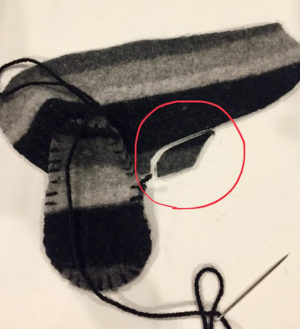
(Note: Even if you don’t stretch the wool, sometimes you need to snip a bit off of the heel piece after you’ve stitched around to ensure it meets the toe piece at the right spot. See photo.)
4) Stitch around the flap (don’t pull the stitches tight or the fabric will curve) and connect again at the middle to complete the arch over the foot, pinching the edges together.
5) Finish by restitching a couple of the stitches connecting the toe and heel pieces, then run a few inches of the yarn through the existing stitches on the heel. If you’d like to knot it, feel free, but I’ve found that the stitches are generally tight enough to hold the excess yarn and keep the end from unraveling.
(In regards to knots, when you need to add more yarn, you can either hide the knot between layers (if applicable), hide it at the meeting place of the blanket stitch, keep it tucked close on the inside of the boot, or, if you have a very thick material, you can avoid knotting altogether and run the excess through the wool and start a new thread.)
Again, very quickly:
- Start at the inside toe and stitch around
- Connect and stitch around the heel piece
- At the arch, stitch halfway over the foot.
- Stitch around the flap and top of boot, reconnecting at the top of the foot.
- Stitch down to the outside of the foot.
- Restitch 2-3 connecting stitches and run the yarn through the stitches to the back of the boot.
Step 4: Attach Velcro
Depending on the kind of wool that you used, you may have a lot of stretch in your fabric. I’ve found that a 1”-1 ¼’ piece of Velcro will do on the flap (make this the fuzzy side to prevent chaffing in case it comes in contact with the baby’s skin) and generally opt for a slightly longer piece on the boot, extending from the outside center of the ankle to the back (this should be the hook part of the hook and loop a.k.a. Velcro). While it would be easier to attach this prior to assembling the pieces, I find that sometimes the Velcro overlaps with the blanket stitch and this way you’re better able to determine the final location on the ankle/back to make sure they match up well.
Ready to get started?! The free template is for the smallest size (about 0-9 mos., and yes, they fit wonderfully over footie pajamas). I’ve also made them in larger sizes, but have received feedback that they’re not great for crawlers, as the dragging can pull them off. My daughter learned to crawl in the spring and walked by fall, so she never wore them during this period. She loved her larger pair the following winter though! I just added some puff paint to the bottoms to keep them from slipping as she toddled on hard surfaces.
If you have any questions, feel free to reach out, and I’d love to see your final product!
— Funky Crunchy Mama