
Stenciling — so old school, right? Like, who does that anymore? My first recollection of stenciling was my aunt (now in her mid-80s) decorating an old desk for me in hearts and teddy bears. It was really sweet, but stylish? Not so much.
However, stenciling does have a place that it’ll always belong, and that’s in lettering.
June 2020 sparked the activist fire in many of us. The death of George Floyd in late May, the protests and riots, followed shortly by PRIDE month shone an inextinguishable light on the injustices that affect the BIPOC and LGBTQ+ communities.
While our family lives in a small, predominantly white community, hubs and I wanted to do something to show support and spread the love.
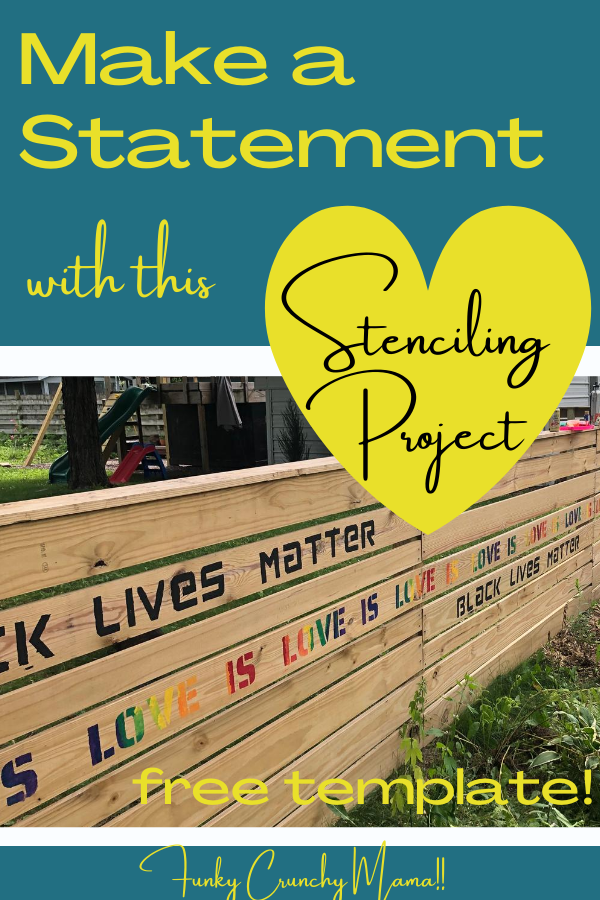
We love to project together, so we tossed around some ideas. I considered creating some art on metal panels. We thought about buying flags to rotate — PRIDE, the planet, BLM. We even considered yard signs (but ultimately decided that they were too temporary). So, we landed on stenciling our messages on our fence.
Initially, we planned to make our own stencils, but it turns out that neither of us is very good at creating proportionate letters. We looked at craft stores for stencils, but they weren’t the size we were looking for and they were only in individual letters, so ultimately we would have needed to make our own with the phrasing anyway.
Time to get crafty!
How to make a stencil
The unique thing about stencil letters is obvious — there’s a connection between points so that the letter maintains its integrity. This can be easy enough to do, but making them aesthetically pleasing freehand can be a big task.
Enter Stencil Fonts
There are any number of stencil fonts available via word processing or design programs, or on font sites like Dafont or Font Squirrel. These sites have varying use rights, but most are free for personal use.
Step 1: Identify Your Font
Your first step will be to identify the font you have in mind for your project and type up your chosen phrase. You’ll also need to determine how big you want your letters to be. We opted for 4 inch high letters for our 6 inch boards.
Step 2: Make and crop an image
Take a screenshot of your phrase to turn it into an image. (You can do this by either hitting the printscreen button on your keyboard (PC) or by holding shift+command+control+3 (Apple).)
Once your phrase is saved as an image, paste it into a blank word processing document and crop it to the desired size.
You can do this by highlighting (clicking on) the image and using the crop button.
Crop and resize it until your frame is at the top and bottom edges of your letters.
At this point you can go into image options and enter your desired height. If your image becomes pixelated, don’t worry. When you cut your letters out, you can smooth over them.
You may need to do this several times over several lines/pages to get your full phrase. We used 8 ½” x 11” paper, so our two phrases took seven pages to print off, with 1-2 letters per line.
Step 3: Make a Stencil
After all your letters are a consistent size, PRINT!
Next, cut out the lines — NOT THE LETTERS! If you have BL on one line and AC on the next line, keep the two letters together, as it will help determine spacing between letters when you lay it out.
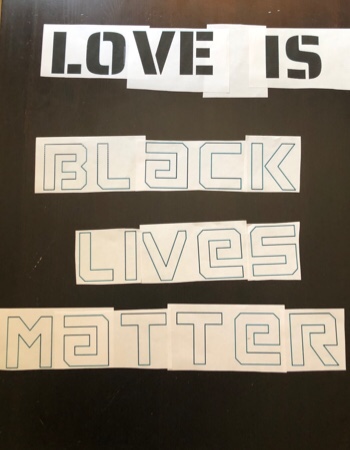
Line up your phrases and tape them together in manageable pieces. We made BLACK LIVES MATTER into three separate stencils, and LOVE IS as one stencil.
After you have them lined up as you’d like them, use packaging tape to tape over the whole thing. Two notes on this:
- Be sure to slightly overlap the layers
- Tape both sides
- Create a sufficient tape barrier over and under the letters, as well as at the beginning and end of your stencil. This will ensure that you don’t get paint around the stencil when you’re painting. (We made this mistake — whoops!)
Cut out your letters
I used one of my kid’s scissors, but a utility or exacto knife would work really well. If you use a knife, don’t forget to protect your surface! I love my self-healing mat for these kinds of projects, but a layer of cardboard should do, too.
Ready to paint!
I recommend one of two painting methods for stenciling. But before we start to paint, make sure you tape your stencil in place so it doesn’t move while you work. It may also be advantageous to invest in some double stick tape or a light spray adhesive for the back of the stencil to ensure any letter fragments don’t blow away or shift in the process.
Paint
Spray paint:
Using spray paint is quick, effective, and easy to do, especially if you’re only using one color. We were using multiple colors, so instead we opted for….
Stippling:
This method involves using either a firm-bristled brush or a sponge brush to repeatedly dab paint over the stencil. It’s great for blending colors and hence was our preferred route.
In order to successfully stipple, make sure your brush isn’t very wet, or it’ll glob and bleed under the stencil.
To stipple, we opted to use those little bottles of acrylic paint that they sell at the craft stores for a couple of dollars each. In total we probably didn’t need more than one bottle, so if you’re only doing one color, it’s a super budget-friendly project.
When you’re done, promptly remove the stencil.
Now, if you’re not a homeowner, but want to make a statement, there are ways you can do this project that won’t upset you landlord:
- Buy a board or post and paint it
- Paint a pallet for your porch
- Make a yard sign or one for your window
If you’re interested in making a stencil with our same messages, please feel free to save yourself a step and download it here. I’d love to see your final result!
Happy painting!
— Melissa, Funky Crunchy Mama

Gosh I can’t remember the last time I used a stencil! Definitely old school but definitely makes a statement as well! A fun activity to do with the kids!