


This is the fifth post in a seven post series on wool rug braiding. Other posts include: Supplies & Wool Basics, Planning Your Braided Wool Rug, Disassembly & Felting, Stripping, Stitching, & Spooling, Lacing Your Braided Wool Rug, and Finishing & Care.
Wahoo! It’s time to start braiding! Are you excited? (I’m so excited.)
I’m guessing that you know which colors and pattern you’d like to start with; if you don’t, read about planning your braided rug to help you decide. I’m partial to starting with neutrals — two solids and one pattern.
After determining your starting colors, your first step will be to stitch together your two solids, just like you when you made the spools. Where these two colors intersect will be your starting point.
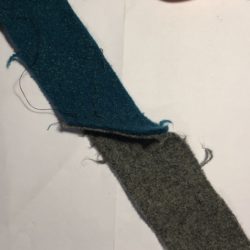
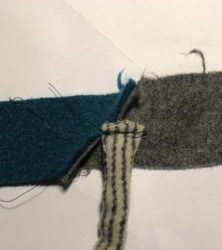
To add in your pattern, you’ll want to create your first “rope.” Your ropes should measure about ½” in diameter. To create these, you’ll want to use a similar process as making bias tape: fold both edges toward the middle, then fold in half. Use a basting stitch to keep it together. (As mentioned in Stripping, Stitching, & Spooling, if you have a finer material, you’ll want to stuff it to create an adequately sized rope.)
When creating a rope, use a comparably colored thread for the basting stitch and don’t put too much focus on good stitching. Over time, these stitches will come loose and fall out; their sole purpose is to keep the finished edges on the outside while braiding. There is a vintage product called Braid-Aids, that’s supposed to help eliminate this [stitching] step. I have a set, however, they seem to work best only with certain fabrics and don’t work very well over seams. Needless to say, I just prefer to stitch.
After you’ve created a rope with your pattern, stitch it to the center of the solids using your sewing machine, creating a T. Then create ropes with the solids around this. This is your starting point.
The Starting Fold
After you have your three ropes ready and set in a T shape, fold your first piece over the patterned rope, then the other.
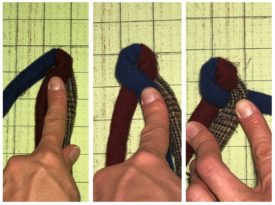
After this initial “fold over” you’ll continue braiding as you would any braid with two disclaimers:
- Don’t twist your ropes. If your basting stitches face left on a rope after the starting fold, they should always face left; if they face right, they should always face right.
- Don’t pull your braid toward you. You’ll want a fairly tight braid, but don’t stretch it.
The Turning Braid
As mentioned in Planning Your Braided Wool Rug, it’s important to have a final size in mind when you start your rug, as you’ll need to know where to turn your braid’s direction.
Making a turn is very simple, just braid one of the ropes over twice instead of just once at your turning point (so it looks like a twist). You’ll only need to do this at your initial turn for an oval rug (after two feet in a 3′ x 5′ rug). The image below shows a turning braid for a circle rug, but the step is the same, it will just be at your turning point instead of at the beginning.
If you’re making a circle shaped rug instead of an oval, you’ll want to use a couple of turning braids in order to get just the right shape. This may take a few tries, but don’t be discouraged.
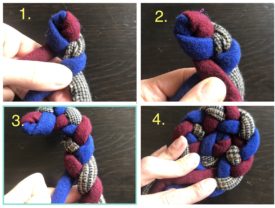
2. Continue braiding; red will create slight turn.
3. When creating a circle, a second turning braid will be needed.
4. Starting circle created.
After you’ve started and gotten past your first turning braid, it’s just a matter of continuing to braid and lace (next in the series!) until you’ve achieved your desired size.
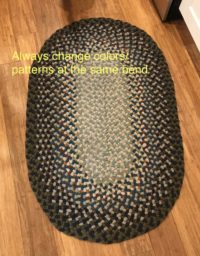
Changing colors/patterns
Eventually you’ll need to switch materials. If you’re making a circle rug, you can do this at any point. However, if you’re making an oval, you’ll want to pick a turning point to change colors at and keep it consistent throughout. This will make these transitions less noticeable.
Starting out, you’ll seem to make a lot of progress very quickly, but after a certain point, progress will slow and you’ll accomplish seemingly less at each sitting. I remember working on my daughter’s rug (which measures about 4’ round) and feeling completely discouraged near the end as I could only finish about half a turn in a night. As I mentioned in Planning Your Braided Wool Rug, for your first rug, choose a smaller size until you’ve determined that this is a hobby that you enjoy.
Enjoy braiding! And I’d love to see your project after you’ve gotten started!
— Funky Crunchy Mama


Made a wool rug didn’t know about felting. Wondering how it will hold up. Have made wool rugs on 2 harness loom waded and it was fine. When I made the strips for braided rug iron Ed with steam
my grandma made me a oval rug out of wool coats can’t tell you how long ago as I’m 80 and I’ve had them for probably 50+ years, I’ve never used them as I can’t get it to lay flat took apart a couple times and redid them steamed them with no luck size maybe 4×5 she did many rugs with great success, why me lord, I just came across your site so I couldn’t pass it by , HELP!!!
How lovely that you still have them! Have they been rolled or folded?
Relacing the whole thing may be your best bet. I appreciate the books that try to explain it with pinning and counting, but if a rug uses various weights of wool, this is sure to end poorly.
Line up a couple feet at a time and work in small amounts to make sure you’re not creating any tension or puckering along the way. You could try using a large safety pin to mark out a foot or so in front of where you’re working to make sure that you’re not pulling too much, but some might say that this could compromise the fiber.
If you’re not up for doing it, try to find a local or regional guild. Perhaps someone could help you! I’d hate to see rugs that size unused or tossed out over such a simple fix and I know others would feel the same.
Good luck!