


This is the sixth post in a seven post series. Other posts include Supplies & Wool Basics, Planning Your Braided Wool Rug, Disassembly & Felting, Stripping, Stitching, & Spooling, Starting Your Braided Wool Rug, and Finishing & Care.
Oh boy! Oh boy! Oh boy! We’re almost there! You’ve learned about wool and washed and prepped it and now you’re sitting with a few feet of braided wool in front of you wondering how it’s all going to come together. After you get your first few rows laced together, you’re going to be elated. It’s so fun watching your hard work pay off (FINALLY!). But before you can sing from the mountaintops, you have to start the lacing process.
In case you haven’t gathered by reading my previous five posts, I love rug braiding — almost everything about it soothes my soul, but I remember lacing my first rug and when I started I wanted to cry. It’s really not that complicated, but I could NOT get the hang of it.
In order to (hopefully) reduce your frustration, I’m first going to explain the purpose and placement of lacing as you’ll use it throughout your rug (after the initial row, if making an oval rug) and then explain the center row.
Before I do that though, I’m going to run over a couple of quick things:
- When lacing, you’ll want to use one of three products to bind your braids together:
- Waxed polyester thread (this is what I use)
- Lacing thread (I’ve never used it, but have heard it’s highly recommended and can be easier to use than knotting pieces together.)
- Nylons (Cut into rings and looped together. It works, but I tend to pull a little too hard and rip them. Avoid using old ones with runs.)
2. You’ll also need a tapestry needle. These are a large needle with fairly blunt tip. You don’t want to pierce your fabric at any point in this process, only weave between the braids. A blunt needle will help ensure that you don’t accidentally pierce your fabric as you work.
3. When lacing, you’ll always want to work from the back side of your rug. You can tell it’s the back side, as it’ll have the back side of your beginning T. Also, when you start lacing, it’s helpful to keep a “tail” of lacing thread on the back side as a quick indicator. After you’ve finished your rug, you can lace this piece into your braids and it will disappear.
4. You’ll need to know how to make a knot to tie one piece of lacing thread to the next. Here’s a video:
Lacing/Laddering
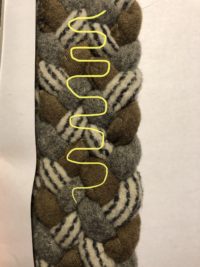
Lacing is all about binding your braids together. It’s a simple process of weaving between the braids on one side then the other. Generally, you’ll just weave between one before switching to the other side, but on occasion, you may need to pick up an extra loop as you grow. The best way to tell is by matching up your sides. If there are two loops before the bottom half of a loop on the other side, weave through two before moving to the other side. Weaving too tightly can create a kidney shaped rug; if you pick up too many, it can end up a little lumpy.
Here is a general guide when working 1:1. The video demonstrates straight lacing.
Starting the Lacing Process
The videos below show how to start lacing both an oval and a circular rug.
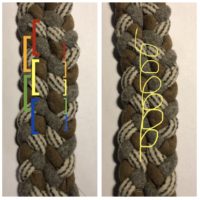
After you’ve started lacing your oval rug, you’ll continue in a pattern that makes a small cursive “e” throughout the initial row, looping under two on one side and one on the other. The two images below match up the 2:1 pattern, whichever graphic works better for your learning style.
At the end of your first row, you’ll want to work around your starting point. Here’s a video on how to get around and start your 1:1 lace on the other side.
Continue lacing 1:1 for the remainder of your rug.
I hope you have an easier time starting the lacing process than I did my first time around. I’d love to hear your experience in the comments below. I hope you’re loving your rug so far!
— Melissa, Funky Crunchy Mama


3 thoughts on “Lacing Your Braided Wool Rug”