


Raised beds are the perfect thing for a novice gardener like myself. It’s a small, manageable space and you have control over the soil that’s put in it so that you don’t need to try to diagnose and cure any immediate deficiencies. These factors equate to fewer expenses and less maintenance — no rototiller necessary, less fertilizer, less weeding, fewer seeds or plants, and less waste if you’re not able to keep up with it or have a bad year.
These beds are just the right amount of space to hold a small salsa garden or some lettuces, peas, and beans. The smaller space also aligns with my beginner gardening goals:
- Give the kids a place to play in the dirt and watch things grow.
- Provide our family with healthy snacks for the summer.
- Bonus if we’re able to grow enough to make some soup for freezing or salsa for canning (I’m yet to learn how to can).

This post contains affiliate links.
The Cost of Building Raised Beds
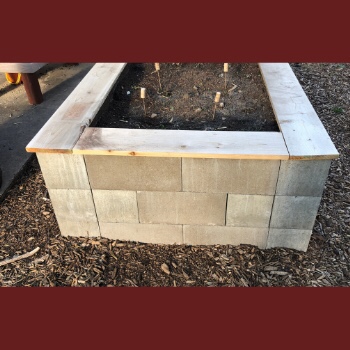
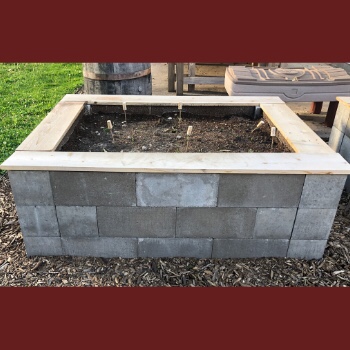
Building a raised bed can be a daunting task, however with cinder blocks, it’s quite simple and inexpensive. At under a dollar apiece, this project can easily cost less than $50 per bed.
These beds are 32” x 48” (interior) and the staggered look not only makes them aesthetically pleasing, but also aids in their stability.
For this project you’ll need:
- 26 8x6x16 blocks
- 20 8x8x8 blocks
- Sand or gravel for laying base
If you opt for the wood top (we liked this, as it warms up the hardness of the concrete blocks), you’ll additionally need 16’ of 1” x 8” board (more if you opt for mitred corners) + some construction-grade adhesive. If you opt against it, you could use the additional space to plant something small, like peas or carrots.
The Base Layer
Before you lay your first cinder block, you’ll want to put down something to aid in leveling. Ensuring that your first layer is level is extremely important in aesthetics. If there’s any discrepancy, it’ll be exaggerated with each additional layer. So dig out a couple of inches where you’ll be laying your cinder blocks and put down some sand or gravel.
As you lay each block in your first layer, check to ensure that it’s level. When your first line is done, check the levelness as a whole. Continue this with each side, as well as checking to make sure that your corners are square.
Again, any discrepancies will continue to be more exaggerated with each layer. Please take the time at the beginning to ensure a quality final product.
I assure you that each level thereafter will be much simpler to lay.
Construction Guidelines
- Each of the corners is built of 8x8x8 pieces, 3 high.
- The short sides are 2 – 16” wide pieces on the first and third level, the second level has 2 – 8” wide blocks on either side of a 16” block (see photos below).
- The long sides are 3 – 16” wide pieces on the first and third level, the second level has 2 – 8” wide blocks on either side of two 16” blocks (see photos below).
 The short side.
 The long side.
After your box of blocks is constructed, consider filling the corners with dirt, or adding in a garden spike or piece of rebar for additional stability. This is probably excessive, but additional precautions never hurt.
If you’re opting for the wooden top, at this point, goop on some adhesive and adhere your boards. Let cure per directions.
Final Comments
We really liked the look of these, especially after we laid some mulch and included a trellis — again to warm up the hardness of the concrete. Bonus that we were able to upcycle an old decorative arch from our yard into a trellis, but something similar could easily be constructed for pole plants to grow on.
Do you have a garden? If so, what do you look most forward to harvesting? Personally I’m really looking forward to green beans!
I’d love it if you’d share your gardening experience in the comments below!
— Melissa, Funky Crunchy Mama